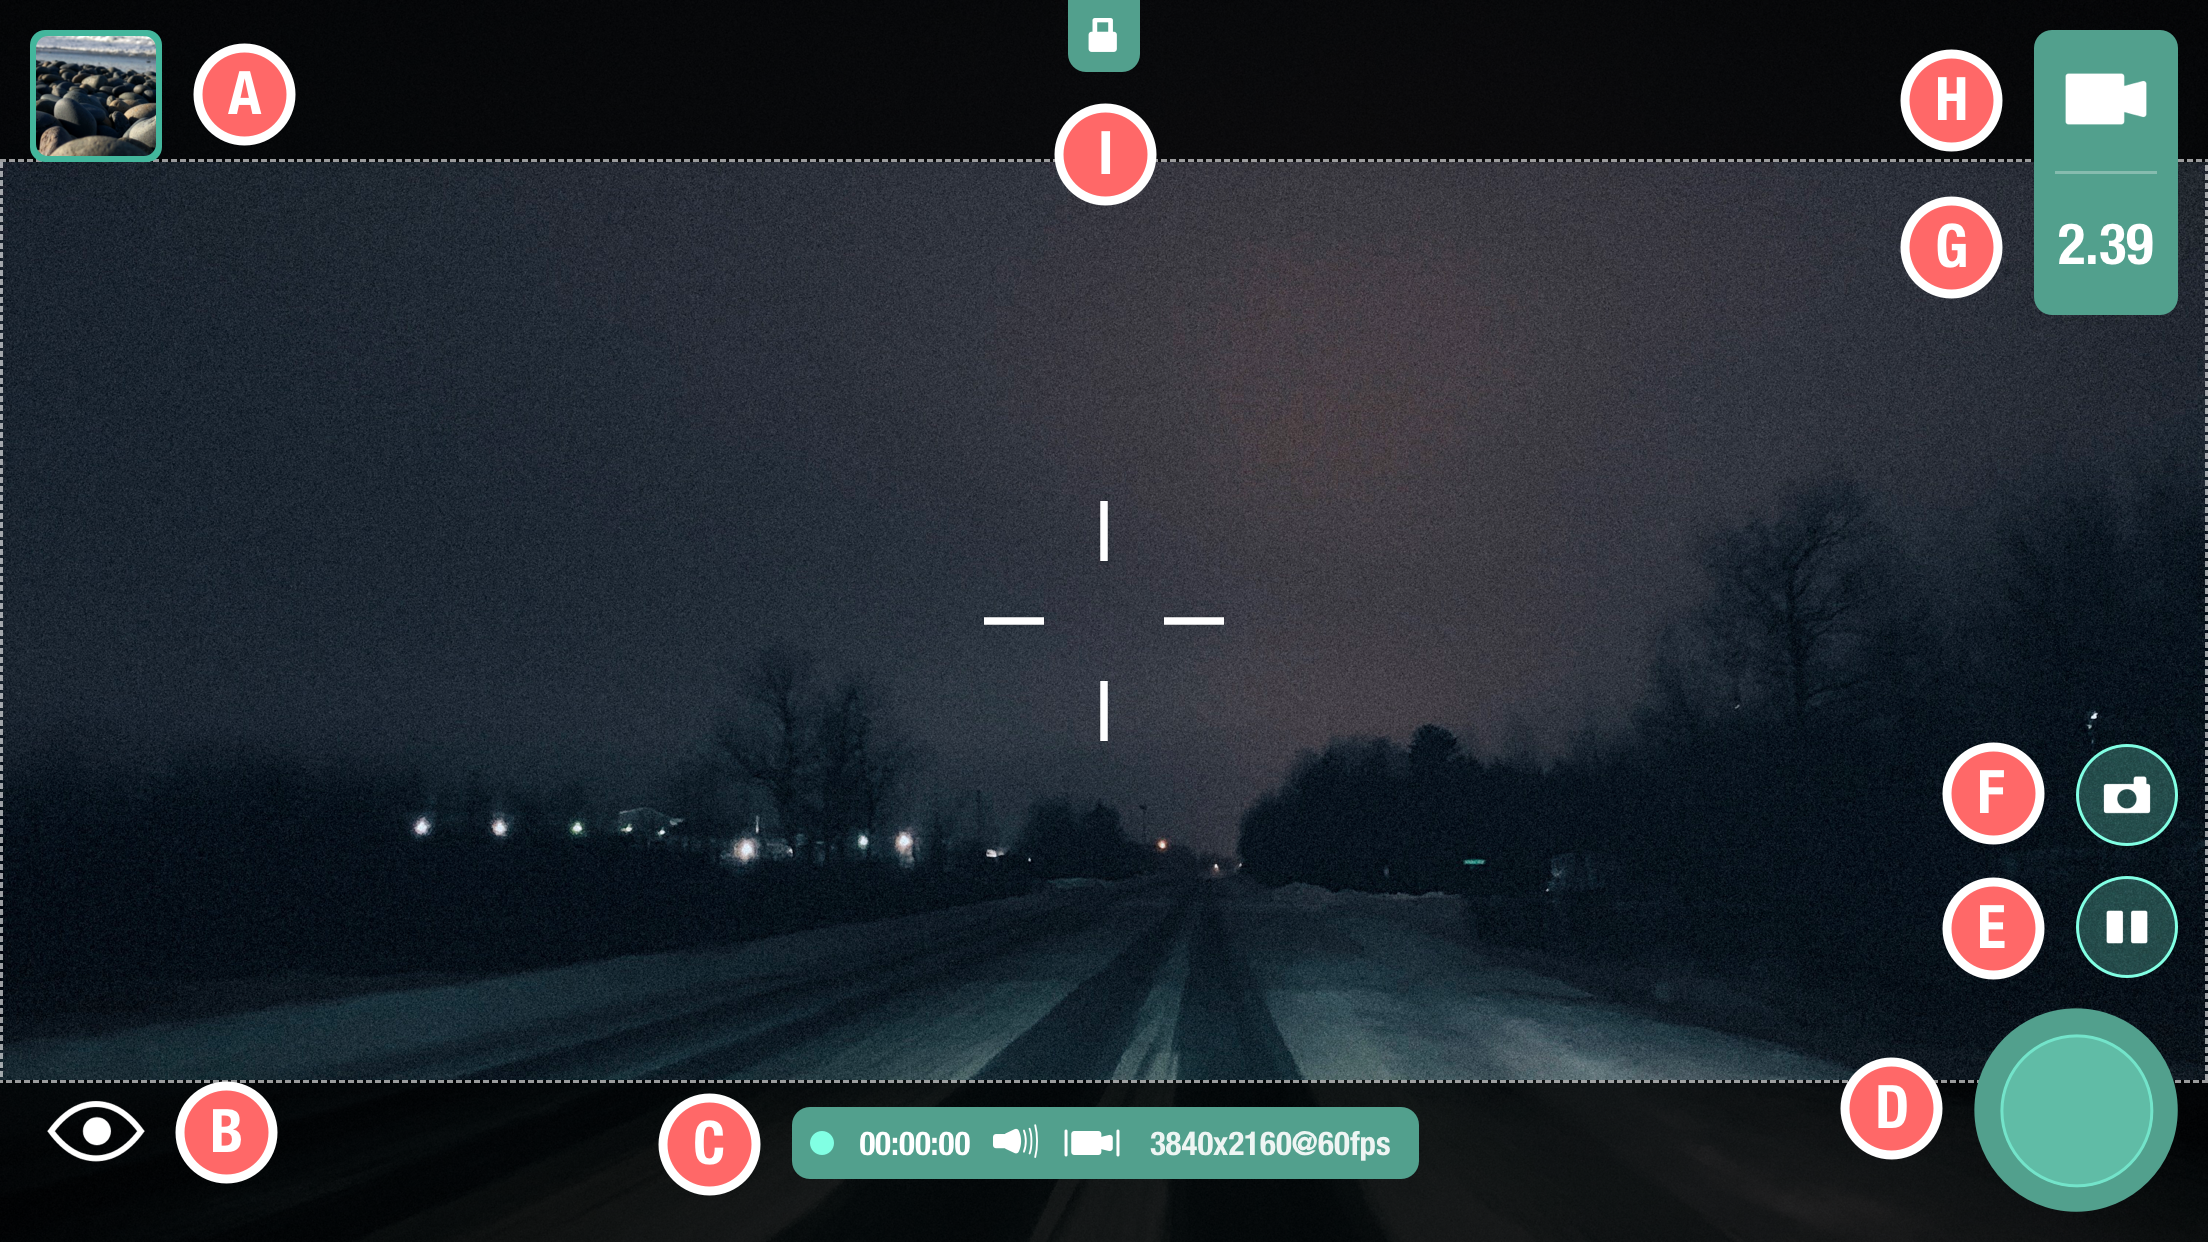
Cinescope 2.5

User Manual

Main Screen

A
Library
Access your camera's photo library.
B
Peek
Minimize the user interface.
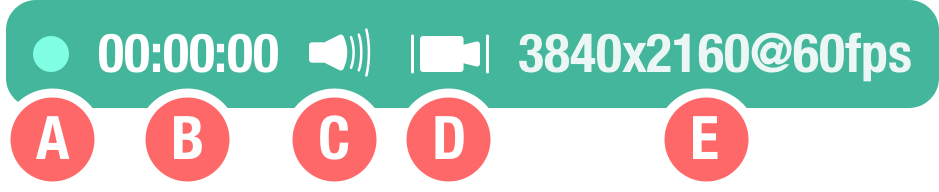
C
Video Capture Info
Displays video capture details.
D
Capture
Captures a photo and begins/ends video capture.
E
Pause
Pauses/resumes video capture.
F
Video Photo
Captures a photo while in video mode.
G
Aspect Ratio
Displays the current aspect ratio. Tap to change.
H
Quick Menu
Displays the current camera mode. Tap to change.
I
Adjustments Lock
Indicates camera settings have been locked by manual adjustment. Tap to return to auto-adjust mode.
Image of primary screen

Video Capture Info

A
Recording Indicator
Blinks while capturing video.
B
Record Time
Total record time for current capture session.
C
Sound Indicator
Indicates whether or not sound is being captured while recording video.
D
Stabilization Indicator
Indicates whether or not video stabilization is active.
E
Recording Quality
Displays resolution and frame rate of current capture session.
Image of video info panel

Quick Menu

A
Photo Mode
Places your camera in photo capture mode.
B
Video Mode
Places your camera in video capture mode.
C
SloMo Mode
Places your camera in high frame rate (slow motion) video capture mode.
D
Filter Toggle
Turns the currently selected filter on or off.
E
Settings
Access camera and app settings, and the help guide.
Image of quick menu

Making Manual Adjustments

Focus
Drag one finger left and right across screen.
Exposure
Drag one finger up and down across screen.
Point of Interest
Tap screen to cause the camera to lock focus and exposure based on location tapped.
Temperature
Drag two fingers left and right across screen.
Tint
Drag two fingers up and down across screen.
Release Locked Adustments
Tap Adjustments Lock button or shake camera to return to auto-adjust mode.

Aspect Ratio Editor

Standard Aspects

A
Custom Aspects
Tap to access your custom ratios.
B
Aspect Options
Tap to select a specific ratio.
Image of standard aspect ratios

Custom Aspects

A
Standard Aspects
Tap to access standard ratios.
B
Aspect Options
Tap to select a specific ratio.
C
New
Tap to create a new custom aspect ratio.
D
Delete
Tap to delete the current custom aspect ratio.
E
Keyboard
Tap to display keyboard for manual aspect ratio entry.
Image of custom aspect ratios

Custom Aspect Keyboard

A
Numbers
Tap to set numerical value.
B
Decimal
Tap to set fracional value.
C
Delete
Tap to delete current value.
D
Keyboard
Tap to exit keyboard display.
Image of custom aspect keyboard

Camera Functions & Settings

Photo Function Options

Capture Format
Uncompressed images are saved as TIFFs. Compressed images are saved as JPEGs.
RAW
Enable to capture RAW data in addition to the standard image. Note: Not all devices support RAW capture.
Flash
Choose between off, auto, or always on.

Video and SloMo Function Options

Video Quality
Choose desired resolution and frame rate. Note: Resoluton and frame rate options are based on device type.
Capture Sound
Choose whether or not to capture sound while recording video.
Stabilization
Choose whether or not to enable video stabilization. Note: The device might internally decide to disable stabilization even if this option is enabled.
Flash
Choose between off, auto, or always on.

Filter Options

Select a filter to apply to photos and videos.

Lens Options

Select which lens the camera should use when capturing photos and videos. Note: Lens availability is based on device type.

App Settings

Volume Buttons
Choose whether or not to use the device's volume buttons to trigger capturing photos and videos.
Location Info
When enabled your lat, long, and heading will be stored in the photo's GPS metadata. Additionally, the time of sunrise and sunset will be stored in the User Comment field of the photo's EXIF metadata. Learn more about viewing your photo's metadata here.
Manual Sensitivity
Determines how much change is applied when manually adjusting focus, exposure, temperature, and tint.
Matte Opacity
Sets the opacity of the area around the aspect ratio view port.
Alignment Grid
When enabled, displays a grid over the live preview to assist with shot alignment.
Grid Opacity
Sets the opacity of the alignment grid.
UI Color
Sets the color theme for the user interface.

Quick Help

A visual walk-through of Cinescope's basic features.

Photo Library

Folders and Media
Folders appear at the top. Media for the selected folder appear below. Tap media to view fullscreen and access options.

Media Options

A
Crop
Tap to enter crop mode where you can crop photos and videos to any aspect.
B
Format
Tap to enter format mode where you can letterbox photos and videos for posting on Instagram.
C
Share
Tap to open the iOS share menu.
D
Share
Tap to delete the current media item. You will be required to confirm deletion.
Image of media option menu

Format Mode

A
Default White
Tap to apply white letterboxing.
B
Black
Tap to apply black letterboxing.
C
Image Palette
Three additional options are dervied from the image's color information.
Image of format menu

Working with RAW Photos

RAW File Type
RAW images have the .DNG file extension.
Photo Processing
RAW captures are not affected by Cinescope's current aspect ratio or image filter...otherwise it wouldn't be a RAW image file! 🙃
Viewing RAW Images
iOS does not support viewing of RAW images. You'll need to access them on a different device.
Accessing on a Mac
Use Image Captureto transfer media to your computer. Use an application like Affinity Photoor Adobe Photoshop to view the images.
Accessing on a PC
Use file exploreror the Photos appto transfer images. You might need to install the RAW extensionto view the images.